Каждый день мы раздаем лицензионные программы БЕСПЛАТНО!
ANALOG projects 3 (Win&Mac) был доступен бесплатно 25 марта 2021 г.
ANALOG projects 3 объединяет в себе уникальные инструменты, которые позволяют вам корректировать источники света, оттенки, зернистость, виньетирование, текстуры, эффекты размытия и бликов, а также создавать профессионально оформленные изображения! ANALOG projects 3 дает вам полный контроль над каждым эффектом, используя которые вы можете добиться уникального вида своих фото!
Основные возможности:
- Профессиональная обработка SCA для улучшенной передачи деталей цвета;
- Корректировка царапин и сбоев;
- Новые пресеты, откалиброванные фотографами;
- Многофункциональное использование: Analog projects 3 может использоваться как плагин для Adobe Photoshop и Lightroom, а также как отдельное приложение.
Обратите внимание: архив содержит также и Mac версию программы!
Системные требования:
Min System Requirements Windows Windows 10/8/7, 32 Bit, Processor Core Duo, 2 GB HDD, 2 GB HDD, 1.280 x 1024 Pixels Screen Resolution, Graphic: DirectX-8-compatible, 128 MB, 32-bit color depth Min System Requirements Mac Mac OS X from 10.7, 64 Bit, Processor Intel/G5, 2 GB HDD, 2 GB HDD, 1.280 x 1024 Pixels Screen Resolution! The plug-in functionality is currently not supported by macOS 10.15 (Catalina).
Разработчик:
FRANZIS Verlag GmbHОфициальный сайт:
https://www.projects-software.com/analogРазмер файла:
423 MB
Licence details:
Пожизненная лицензия, которая может быть использована на двух ПК
Цена:
$69.00
GIVEAWAY download basket
Комментарии
Понравилась программа? Оставьте комментарий!
This has been given away before, but is still the latest version, which is nice. Franzis make some serious tools (such as Sharpen Projects, HDR Projects, Black and White Projects) but also some fun things to play with images in. This is in the latter category. Anyway as the version hasn't changed I can save a lot of time this morning by just copying my previous comments, in the hope it is helpful to someone... oh, but it needs some updating, I'd best get on it...
It's a bit of fun and this is the latest version, although perhaps more as there hasn't been an update for some time.
Anyway here's my latest comments on it (I have it already)...
As usual a complicated registration process if it's your first time with Franzis.
My one (GAotD a couple of years ago) came with a Raw file import library from 2014 so straight-out-of-the-box won't support more recent cameras. However you can just copy a later version of FreeImage.dll over the one in the program's directory to help with that (although it's still not completely up-to-date). I haven't checked and possibly it has been updated here, as it's a newer installer.
Look in "C:\Program Files\Franzis\ANALOG projects 3" and see it has an old version of FreeImage.dll, which is the library that decodes Raw images from your camera (you don't care if you only plan to use it with JPEGs). I replaced this with the newest version I have (once I've shut the program down so don't have a sharing error)...
From:
FreeImage .dll 6562,304 .a.. 16-01-17
To:
FreeImage .dll 6924,800 .a.. 26-02-19
Alas usually you can download later versions from Franzis, but the downloads haven't been updated so you have to go to:
https://freeimage.sourceforge.io/download.html
and download the DLL (second link down the page)
Unzip the archive and choose the correct copy (x32/x64 - if you're running the 32-bit version of Windows your computer won't have a directory "C:\Program Files (x86)") of FreeImage.dll from FreeImage\Dist (which is 3.18.0.0, same as the one I used). I did install and test this exact file and it does work with supported cameras. You don't need the archive afterwards.
Note these are still not completely up-to-date, so recent cameras may not have Raw support and you have to use the JPG or make a 16-bit TIF file in your favourite Raw processing software. You may never bother with Raw with this tool anyway as it's not critical.
If you have a Mac you'll need to get the OSX version of FreeImage from SourceForge and replace the existing one, wherever it might be.
Here's my getting-started instructions on using it:
Load a picture, play with the canned effects on the left side, play with the Film Type on the right side panel (which should start on the “Finalise” tab). You can then mess with assorted settings in the middle of the panel and at the bottom of the panel you can select toning options.
Changing to "Expert" in the right panel you can add filters from the list at the top, select them in the middle of the panel and tweak their effects at the bottom (may need scrolling down). (I'd ignore that until you are comfortable using it.)
The boxes at the top of the left panel just filter the effects that are listed in the panel, so ignore them initially. Although one use you might want to play with is, when you run down the presets looking for ones you like, you click the * beside them to mark them as favourites. When you're done click on favourites at the top to just show those (click "All" to return to seeing all the presets). This does mean with the next image you'll have to deselect ones that are already selected, if they aren't making the cut. Of course you could also use it just to slim down to a few general favourites.
On a faster computer you can use the Eye icon on the toolbar to disable the preview mode and show the final image in the main window, which IMHO is worth doing. (Although note items on the toolbar can disappear if the Window is too narrow to show everything. If you don't see something you think should be there make the program's window wider.)
Press and hold the right mouse button on the image to see the "before" image. Double (left button) clicking on the image zooms you all the way in/out (one after the other). A mouse scroll wheel also zooms. When not zoomed fully out the left mouse button can drag the viewing area around the image.
When saving the final image note that the first dialog, where it asks for the title, is going to write that over the image, it isn't the file name.
The main disadvantage is the lack of Undo operations, you can set restore points though (which appear in a timeline).
Note that although they do add a Photoshop plugin it's under File->Export, not Filters, which IMHO doesn’t really count. (You need their v5 products to get "real" Photoshop filters.)
The thing to get your brain around is it a huge pile of image processing tools, which are gathered together into presets in the left pane. All those options do is select a bunch of processing tools (as shown in "expert") and choose options for them, so they are infinitely tweakable in the right pane.
P.S. Note it's not high-DPI (i.e. 4k/5k monitor) friendly. I'd recommend, on WIndows 10, that you right mouse button the program, select Properties, then the Compatibility tab, click "Change high DPI settings", tick "Override high DPI scaling..." at the bottom of the next dialogue and select "System (Enhanced)", or if that doesn't work well then "System".
Can't get registration code or register, website comes up with 'Whoops, looks like something went wrong' on the next page
Always good software. All programs from this company are large (file size), and they are often earlier versions offered. This go-around offering is the current version. And yes, the registration process is a bit challenging for the first time register.
I downloaded and installed the program. All went well until it came time to register it. When I paste in the serial number and click activate, it tells me "Activation failed! Internet connection error." However, my internet is working just fine. I can get to other pages, etc just fine.
I'm too old to be going thru Franzis's outlandish registration process.
I must admit they do make great software.

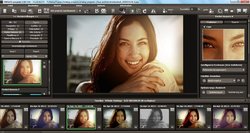
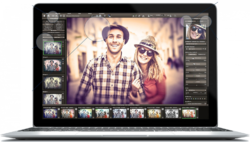
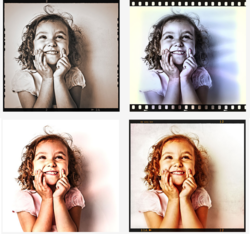

Программа для введения художественных ретро-эффектов в фотоснимки. Тут надо понимать, что вводятся технические дефекты, присущие старым снимкам, но сделано художественно. Идет с плагином для Фотошопа с версии 14 (у меня 12, не поставилось). По идее, рассчитано на новичка, программа работает через готовые пресеты. Их очень много. Но нажмете справа вверху кнопку professional - и интенсивность составляющих пресета можно менять. То есть, в принципе, все настраиваемо.
С плагином для Фотошопа все было бы вообще проще пареной репы: выбираешь понравившийся пресет, создаешь отдельный слой и накладываешь с нужным уровнем прозрачности. Мне, скорее всего, придется сохранять в программе переработанный файл, открывать вторым слоем в Фотошопе и накладывать как хочется. Ибо регулировка уровня professional в самой программе что-то утомительна.
Есть имитация цветопередачи многих марок пленок. Хорошо, что советской цветной пленки нету.
Вообще программа, в которой можно делать совершенно изумительные виньетки. То есть обычно - это затемнение или засветка по краям снимка. А тут - нет! Тут размытие плюс расплывающиеся источники света. Офигеть можно!
Настоятельно рекомендую, может использоваться даже новичком.
Save | Cancel